Page 5 of 8
Re: Duke's Rehab of the CABO 204 Centercon...
Posted: December 30th, 2009, 9:09 pm
by DukesFin
Well, the hull is back on the trailer! I flipped it by myself and I will NEVER do that again. It turns out, that while you may think you've got "center of gravity" figured out, Newton will teach you a thing or two. You may find yourself perched on the corner leg of an engine hoist as if you were a counter weight on a sailboat holding on with one hand, cell phone poised to dial in the other, all while 4' off of the ground, trying to figure out why in the hell you decided you'd try to flip a hull by yourself! Anyway, I got it flipped and all is well!
I got the final layers of glass in the bilge area, so next I'll be priming and painting the bilge. While that paint is drying/setting, I'll be prepping the deck for primer.
Once I get the bilge done, and plumbing (thru-hulls and hoses), I'll be ready to put the two halves back together again, prime and paint!
I hope everyone had a very Merry Christmas and you all have a safe night tomorrow! Stay out of trouble!
Duke
Oh, I almost forgot... The guy that shares the warehouse who used to have a big Fountain racing boat... I asked him if when he sold his boat, did he sell the stereo as well. He said he did NOT. I asked him if he'd sell it to me and for how much...
He gave me his Kenwood AM/FM/CD head unit, kenwood remotes (wired and wireless), 4 50-watt 6.5" Kenwood marine speakers and a handheld VHF
Cost: $25!!!!!!!!!!!!!!!!!!!!!!!!!!!!!!!!!!!!!!!!!!!!!!!!!!!!!!!!!
Re: Duke's Rehab of the CABO 204 Centercon...
Posted: December 30th, 2009, 9:51 pm
by Tidedancer
I would say that is a fair price for all that.

Re: Duke's Rehab of the CABO 204 Centercon...
Posted: December 31st, 2009, 7:56 am
by Slough
You be jammin, Ole TD will be able to hear ya coming up the river!
Re: Duke's Rehab of the CABO 204 Centercon...
Posted: December 31st, 2009, 7:57 am
by DukesFin
Slough wrote:You be jammin, Ole TD will be able to hear ya coming up the river!
I don't know about that... His ears ain't no "spring chicken" ears!!!

JK Chuck!!!
Re: Duke's Rehab of the CABO 204 Centercon...
Posted: December 31st, 2009, 8:02 am
by wevans
Re: Duke's Rehab of the CABO 204 Centercon...
Posted: December 31st, 2009, 8:03 am
by DukesFin
Actually, she has sanded for about an hour. I don't understand, but she hasn't been back since!!!
BWhaaaaahaaaaaaaahaaaaaaaa!!!!
Re: Duke's Rehab of the CABO 204 Centercon...
Posted: December 31st, 2009, 10:13 am
by qoutrage
Duke, seems you have accomplished the hard part of the project and may be on the down hill side of it, now.

The guy gave you a Christmas present with the price of that sound equipment. Nice of him and good deal for you.

As to Meli's 'sanding' attention span...I doubt I'd last much longer than she, unless I had a motor between me and the sandpaper.
Looks like your thread has attracted another BBFN member.
Welcome to the forum Rob. Great folks here, if you didn't already know.
Keep on rockin', Duke.
Re: Duke's Rehab of the CABO 204 Centercon...
Posted: January 3rd, 2010, 4:26 pm
by DukesFin
Well, I've made more progress and I'm now ready to put the cap/deck back on the hull...
Primed and painted the bilge.
Sanded the whole deck/topside, ready for primer.
Re-plumbed my livewell, 2 fish boxes, 4 front coolers.
Carpeted the inside of the console "dash".
Installed the bilge pump and float switch.
Replaced all thru-hull fittings at transom and bilge.
Installed the transducer.
Installed the new fuel fill line and vent line.
Ran the wiring to the front nav lights and front speakers.
All below the water line, all thru-hulls got 5200 and above the water line, they got silicone. The next time anyone wants to change anything below the waterline, they'll have fiberglass work to do!!!
It sure is a LOT easier to do all of the plumbing and bilge work when the deck is off of the hull!!! Easy-peasy! I felt so good about all of my fittings/sealants having complete access to them!
Tomorrow, Tuesday or Wednesday, the cap goes back on, the warehouse gets cleaned/re-organized, the hull gets cleaned and ready for primer!
I'M AT THE HOME STRETCH NOW!!!!!
Re: Duke's Rehab of the CABO 204 Centercon...
Posted: January 3rd, 2010, 7:56 pm
by Flint River Pirate
You have come a long way!! I enjoy the updates.
Re: Duke's Rehab of the CABO 204 Centercon...
Posted: January 3rd, 2010, 8:01 pm
by DukesFin
Thanks!
I forgot one thing... All of the "backing plates" for the thru-hull fittings (they only used two - one for each thru-hull drain) were made out of plywood. They looked like donuts. I really don't like the plywood as even if you coat/seal them in epoxy, there is a chance of rot and if something is going to rot, I really didn't want it to be part of a thru-hull fitting!
I went to WalMart and picked up an acrylic cutting board (the white plastic kind). I had my buddy who shares the warehouse cut out 5 new backing plates on his laser cutter. They came out perfectly! I now have one backing each of the previous thru-hull "mushroom" fittings, one backing for the high-speed water clamshell and one for the transducer.
I'll take pictures of them next time I'm out there, but I really like not having to worry about any of the thru-hull facets NEVER rotting out!
Re: Duke's Rehab of the CABO 204 Centercon...
Posted: January 4th, 2010, 11:34 am
by Natureboy
I am impressed Duke. When you finish you re going to have a great boat Cuz!
Re: Duke's Rehab of the CABO 204 Centercon...
Posted: January 4th, 2010, 9:08 pm
by DukesFin
As promised, here are the pictures of the bilge area work:
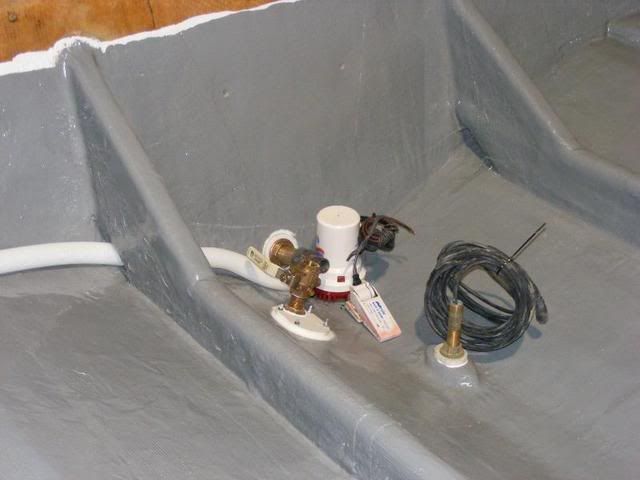
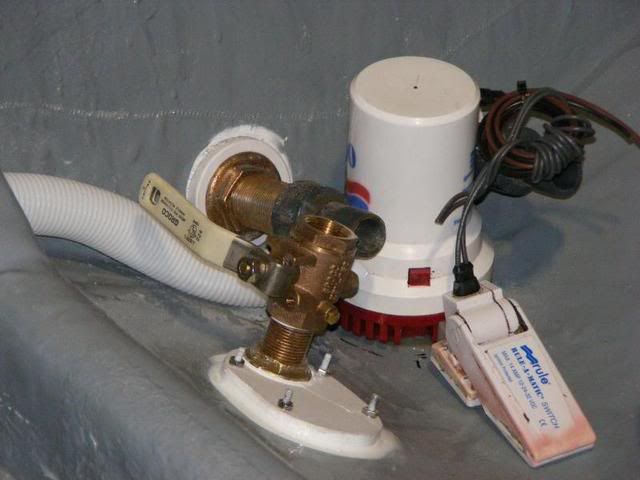
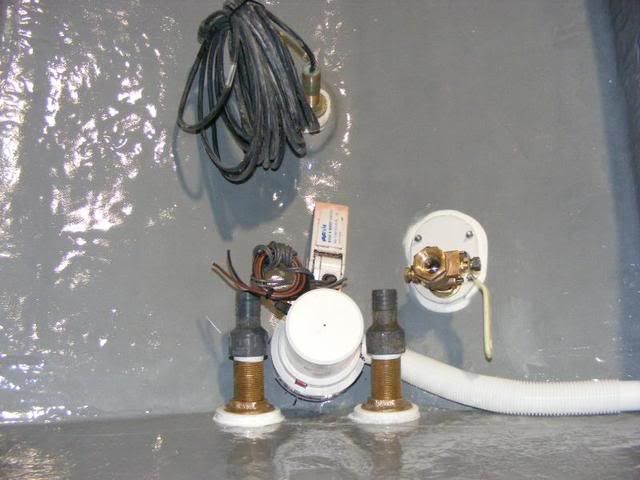
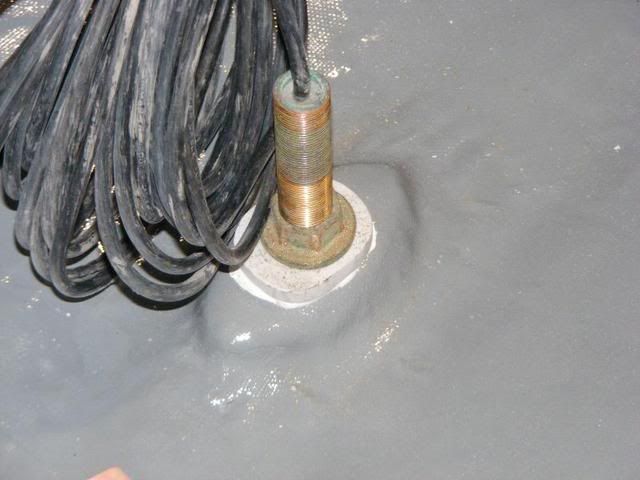

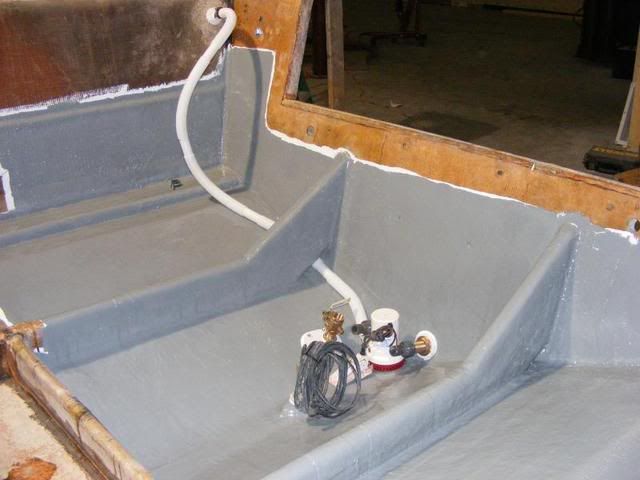
What you are looking at is obviously the transom. Through it, you will see the two drains that carry the livewell water out (one thru-hull), and the other one is the drain for the rear fish boxes. They each of 1" ID hose. I've got a 1500 Rule bilge pump and float switch. Also, you see the football shaped housing for the transducer that I fabricated and installed. Lastly, there is the clamshell pickup and shut-off valve.
If you look, you can see the white acrylic (cutting board material) backing plates for each item that goes through the hull and each fitting is sealed of both sides with 5200. They aren't going ANYWHERE anytime soon without some serious work. All thru-hull fittings are bronze except for the bilge pump outlet.
Have a great one!
Looks like once I put the deck back on the hull tomorrow or the next day, I'm on "hold" until the weather warms up a bit. With the freezing temps we have here this week, the warehouse is not going to get up to or above the 50 degrees that I need to apply my paint. I'm a little worried I may have to pay for 2 extra weeks in the warehouse, but it is what it is, you know!
Re: Duke's Rehab of the CABO 204 Centercon...
Posted: January 5th, 2010, 7:35 am
by reelcatch
Duke are you sure you weren't a boat builder in another life or something?? These pictures look GREAT and I cannot wait to see the finished product. You have reason to be extremely proud of the work you have done so far.
Re: Duke's Rehab of the CABO 204 Centercon...
Posted: January 5th, 2010, 7:37 am
by DukesFin
Thanks bud! I'd love to do this kind of work for a living, but I know it's too hard to make a living at it.
Dad came by this past weekend to see my work and while there, he remembered he built a boat out of plywood when he was around 10 years old. He had completely forgotten about it. Sealed it with roofing tar and painted it green. He said it worked too! I guess all of this is his fault!!!
Re: Duke's Rehab of the CABO 204 Centercon...
Posted: January 6th, 2010, 9:08 pm
by DukesFin
Well, I got the boat back in ONE PIECE tonight!
Connected all of the hoses in the bilge, connected the new fuel fill hose and vent hose, then put a zillion screws around the perimeter!!!!
Next step is to glass the cap back to the transom again. I can't decide if I want to use thickened epoxy and chopped fiberglass strands or to wet out a bunch of mat and shove it in the space. I've got up to 1/2" of space between the two parts to fill, so I'm leaning towards the thickened epoxy. That's what was there before and it seemed to hold up just fine.
Anyway, I'm getting another epidural tomorrow (I've got another 2 herniated discs but L4/L5 is the bad one), so no work on it tomorrow.
It feels so good to see her back in one piece though. I sat there for 15 minutes just staring at her after I put the last screw in the side!