

Good deal.. Nothing like self satisfaction in completing a task, unless maybe it's comments from your peers in that regard. As others have said, you are doing a fine job and I for one am impressed, not that you are looking to impress anybody.
Good luck with that back problem. I'd say you probably need to give it a good rest.
Duke's Rehab of the CABO 204 Centercon...
Moderators: bman, Tom Keels, Chalk

Re: Duke's Rehab of the CABO 204 Centercon...
Now we need to see some more photographs................just to make sure you have put it together right. 
Re: Duke's Rehab of the CABO 204 Centercon...
Cran, here's my latest dilema:
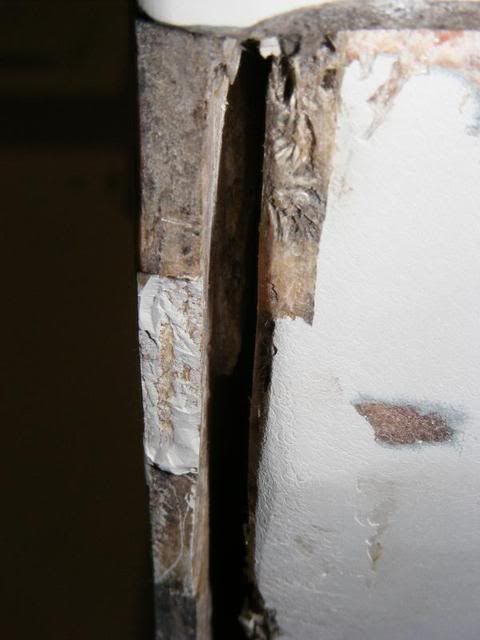
Okay, I've got the boat back together again, except for the transom/motor well. This was bonded at the factory with Peanut Butter. Should I go back with the same? It's 1/2" thick at it's widest and 1/8" thick at it's thinnest.
I'll have to put a backer plate of wood or something just to hold the resin in, but I was also thinking of wetting out CSM and shoving it in there with a metal scraper (1" wide) and/or a screwdriver. I was thinking that CSM would give me more glass in the mixture.
I'll be using WestSystem Epoxy...
Here's a MSPaint view of what I'm talking about...
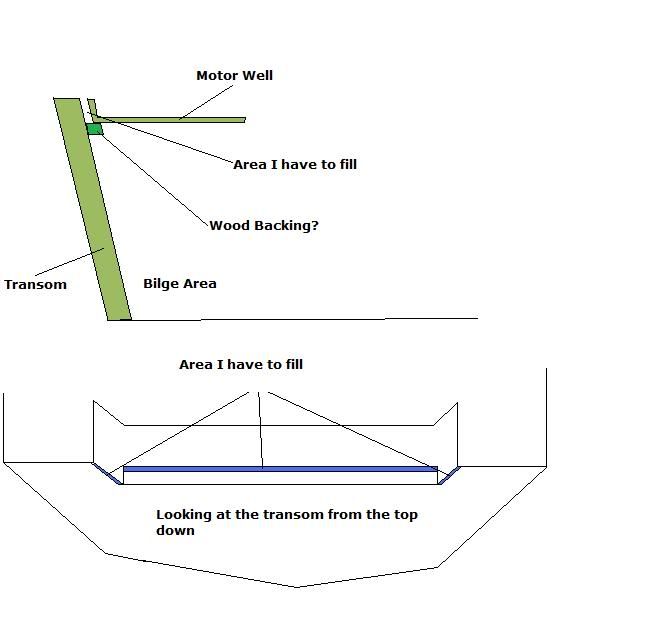
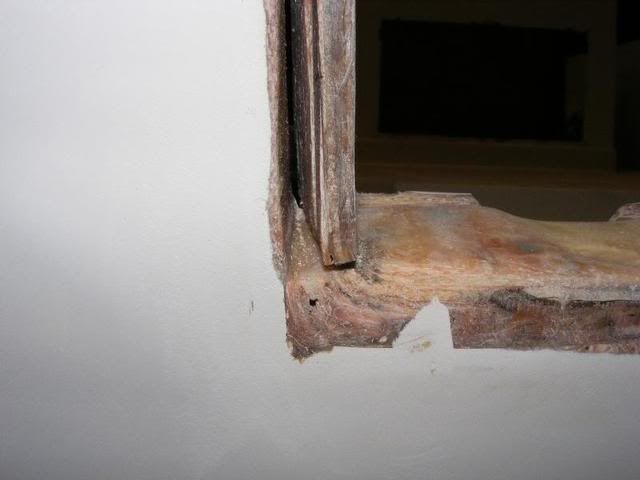
Okay, here are the real pictures of what I have to fill on my transom. I think I came VERY close with Microsoft Paint though!
So, given the pictures below, what is your recommendation:
Bottom Left corner of transom wall:
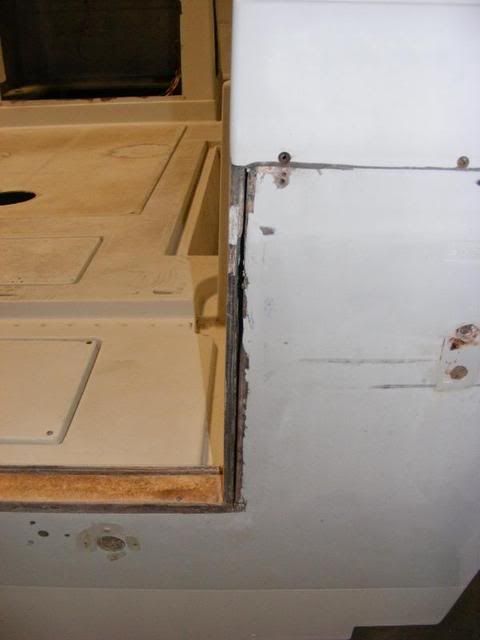
Looking down at the top of the transom:
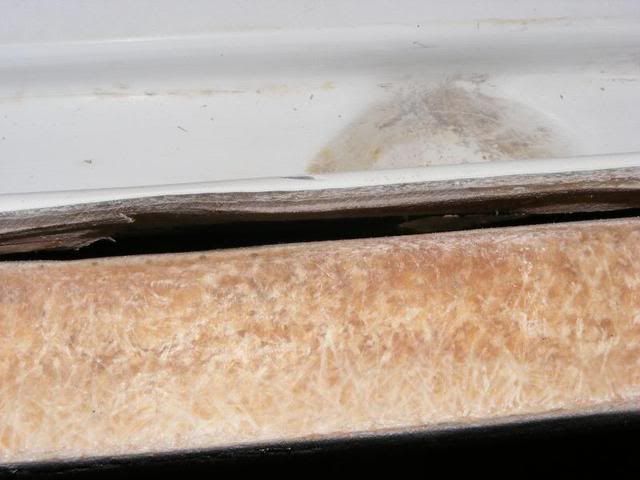
Looking all the way down the topside of the transom:
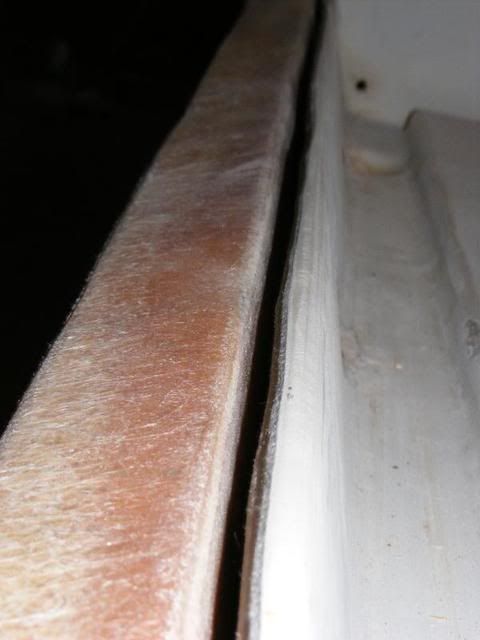
Top of the right side:
And finally, the right side of the transom:
You can see the PB mixture they used before in the first picture... Should I go back with the same?
Okay, I've got the boat back together again, except for the transom/motor well. This was bonded at the factory with Peanut Butter. Should I go back with the same? It's 1/2" thick at it's widest and 1/8" thick at it's thinnest.
I'll have to put a backer plate of wood or something just to hold the resin in, but I was also thinking of wetting out CSM and shoving it in there with a metal scraper (1" wide) and/or a screwdriver. I was thinking that CSM would give me more glass in the mixture.
I'll be using WestSystem Epoxy...
Here's a MSPaint view of what I'm talking about...
Okay, here are the real pictures of what I have to fill on my transom. I think I came VERY close with Microsoft Paint though!
So, given the pictures below, what is your recommendation:
Bottom Left corner of transom wall:
Looking down at the top of the transom:
Looking all the way down the topside of the transom:
Top of the right side:
And finally, the right side of the transom:
You can see the PB mixture they used before in the first picture... Should I go back with the same?
Re: Duke's Rehab of the CABO 204 Centercon...
Duke, I am certainly no boat builder and have very limited experience with fiber glass but I have to think that the manufacturer did some extensive research before deciding on what to put between those two. Probably a lot of trial and error. Just my .02 but I would tend to go back with what came out.
Pictures look great and the detail if fantastic. Keep em coming.
Pictures look great and the detail if fantastic. Keep em coming.
Re: Duke's Rehab of the CABO 204 Centercon...
I did go back with what was there, however, I'm going to do a little more reinforcing with fabric on the top-side... I'm going to wrap 2 layers of fabric over the "cap". I seriously doubt I'll put the aluminum angle back on it though, but I have not decided firmly yet.
It turns out that filling the two sides vertically were the hardest. The process I used was to put a layer of cloth (fiberglass, of course) on the back sides and let that start getting firm before I started filling with my PB mix. The horizontal part did fine... actually perfectly! The port side sprung a leak and I found my PB mixture, being a little bit thin so it would flow from both the caulking tube as well as into the space I was filling, ran down the inside of the transom down towards the bilge. I quickly added some duct tape inside and that stopped the leak.
Yesterday, I had to finish filling the top 3 inches on both sides, so that is now DONE! Hopefully, I'll be able to wrap the horizontal part with the fabric today. I got side-tracked yesterday by installing the two deck drains out of the transom. I also had my old fuel filter housing/mount that was NASTY with salt/corrosion/junk. I took it into the shop and hit it with the media blaster, then to the wire wheel. Now it shines like NEW! Just a little pitting on the outside, but nothing too deep or horrible. I dare to say it looks better than many that are installed on boats today!
It was amazing how much stability/structure the "filler" did to the rear of the deck at the transom! Solid as a rock now!
With the weather warming up here, I should be well into the primer by the end of the week... Hopefully, I'll have the deck primed and prepped for the first coat of finish paint this weekend, but we'll see.
I've learned what proper planning does for a project like this... It tells you exactly how far BEHIND you are!!!!!!
-
Tidedancer

- Site Sponsor
- Posts: 2402
- Joined: October 2nd, 2002, 7:30 am
- Location: Carrabelle Beach, FL
Re: Duke's Rehab of the CABO 204 Centercon...
Sounds great Duke. When are we going to see some updated photos?
Re: Duke's Rehab of the CABO 204 Centercon...
I'll snap some tonight. I've got to fly to Chicago tomorrow and will be back Wednesday night, so I'm going to have a lull in the progress for a bit.
-
countryboy
- Posts: 34
- Joined: January 6th, 2010, 10:12 am
Re: Duke's Rehab of the CABO 204 Centercon...
Great project. I'm late catching up but have enjoyed you look from the inside. can't wait for the finish. I can see many fish upon your decks. Have a great trip to the north lands and look forward for more updates.
Re: Duke's Rehab of the CABO 204 Centercon...
It's pretty funny... Cleaning and sanding the deck, I've found remnants of old fishing trips...
I had to sand a lot of this off of the gel coat:
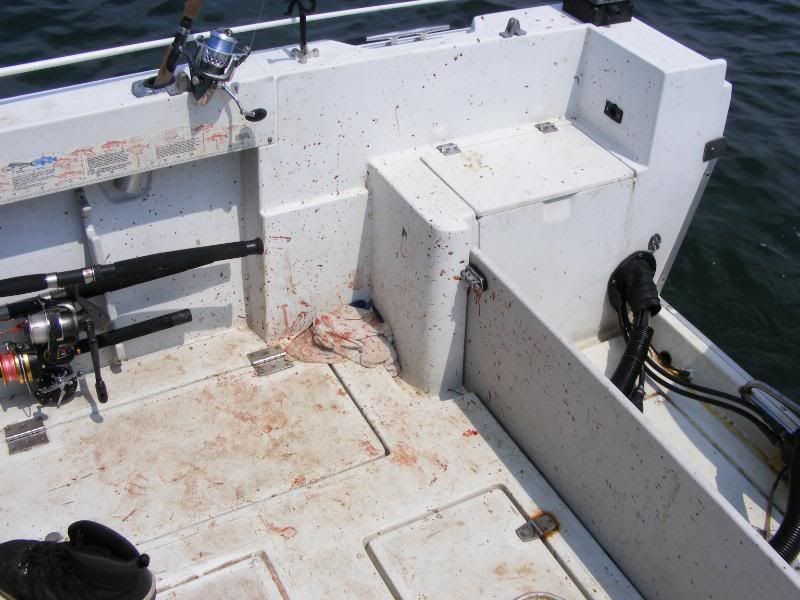
These are what did THAT:
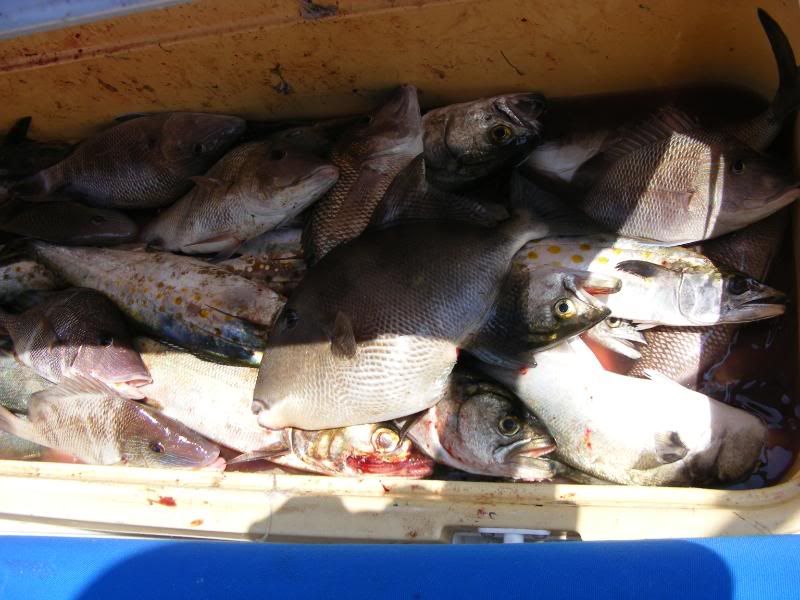
THAT was a fun day!!! I only thought I had cleaned all of that blood up, but NOPE!!
I had to sand a lot of this off of the gel coat:
These are what did THAT:
THAT was a fun day!!! I only thought I had cleaned all of that blood up, but NOPE!!
Re: Duke's Rehab of the CABO 204 Centercon...
Duke, Did you make it back?
Should we send out help?
You have a boat to finish !!!
Just getting worried about you.
Should we send out help?
You have a boat to finish !!!
Just getting worried about you.
Re: Duke's Rehab of the CABO 204 Centercon...
Ah, work continues!!!
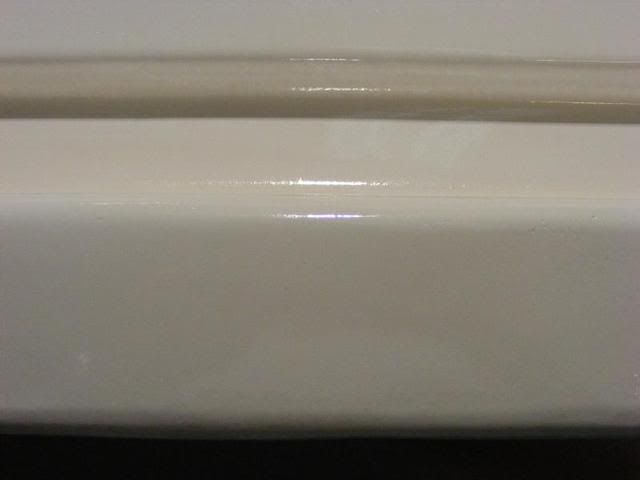
I've got the transom all bonded now and the topsides have gotten the primer and it's first coat of "finish" paint on it. I'll do my best to get some pictures tonight... That is, IF I find time between the sanding I'm going to have to do in order to remove the RUNS I got in the finish paint! I remembered how last time I sprayed the hull sides with Brightsides, I wished I had thinned it a bit more. I thinned it this time, but forgot to adjust the flow (paint or air) as well as changing how slowly I was moving the sprayer... I've got about 6 or 7 runs to fix before the 2nd layer goes on it...
It sure does shine though!!!!

Re: Duke's Rehab of the CABO 204 Centercon...
Good talkng to you Duke. I am ready to meet you out in the bluewater!
GEAUX TIGERS!
Re: Duke's Rehab of the CABO 204 Centercon...
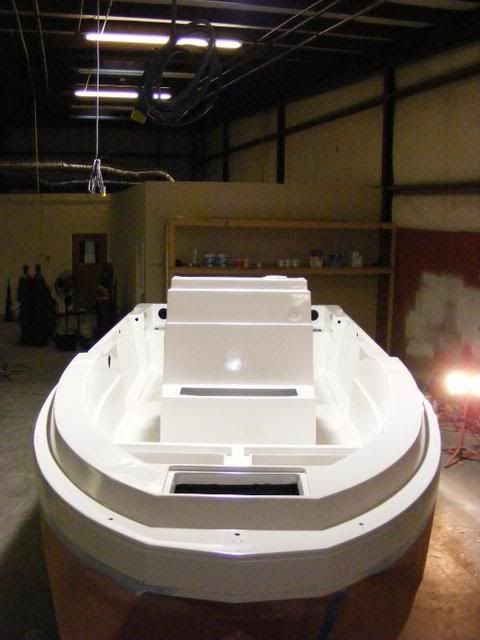
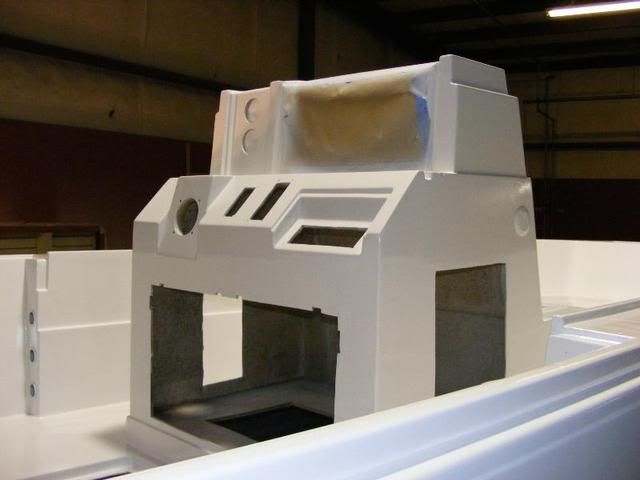
Okay, here is the update with pictures!
I was able to get the transom and cap re-bonded. I did go with fiberglass cloth on the inside, then filled with the "peanut butter" mixture, then 3-5 layers of cloth on top for strength.
Once I got that done, it was time to sand, sand and sand some more in prep for the first coat of primer on the topsides. I was able to get the primer shot, then sand more in prep for the 1st coat of finish paint. I shot the finish paint last night. When I shot the hull sides, I wished I had thinned the paint a bit more, so I thinned it this time. The only problem was that I didn't alter the flow of paint or air coming from the gun, nor did I quicken my "strokes", so I ended up with 6 or 7 bad runs/sags in the paint. I was really dreading coming in tonight to start sanding.
Good news is that most of them really laid themselves down, so I don't have nearly as much sanding to do in prep for coat #2, but it was still just a hair too tacky to sand tonight, so I snapped some pictures and left...
I'm going to post pictures in 2 separate posts so you can see some before and after shots...
Here are the first shots...
Remember the boat in my carport a few months ago?
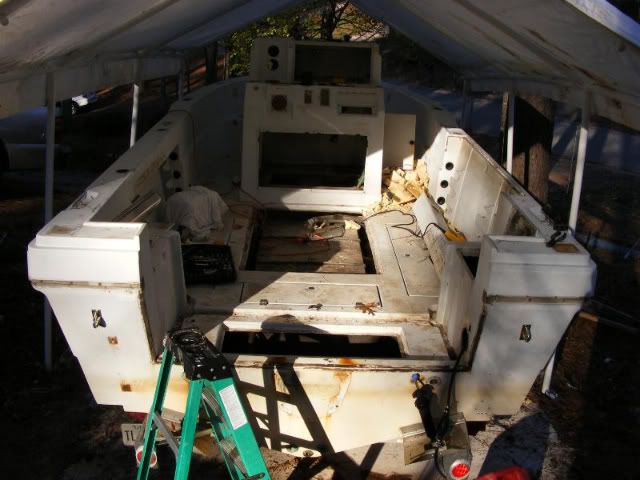
Here it is now:
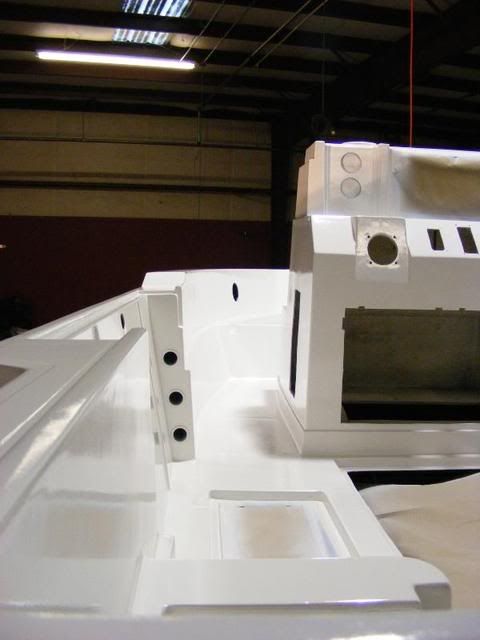
And the transom work...
This:
Turned into this:
This:
to this:

Okay, the next set of pictures are just miscellaneous pictures of the paint today... You may see some of the runs, but I'll you what... I'm so pleased! It looks so much better!!!!
Next post coming up shortly... I have two other sites to post this on!
I was able to get the transom and cap re-bonded. I did go with fiberglass cloth on the inside, then filled with the "peanut butter" mixture, then 3-5 layers of cloth on top for strength.
Once I got that done, it was time to sand, sand and sand some more in prep for the first coat of primer on the topsides. I was able to get the primer shot, then sand more in prep for the 1st coat of finish paint. I shot the finish paint last night. When I shot the hull sides, I wished I had thinned the paint a bit more, so I thinned it this time. The only problem was that I didn't alter the flow of paint or air coming from the gun, nor did I quicken my "strokes", so I ended up with 6 or 7 bad runs/sags in the paint. I was really dreading coming in tonight to start sanding.
Good news is that most of them really laid themselves down, so I don't have nearly as much sanding to do in prep for coat #2, but it was still just a hair too tacky to sand tonight, so I snapped some pictures and left...
I'm going to post pictures in 2 separate posts so you can see some before and after shots...
Here are the first shots...
Remember the boat in my carport a few months ago?
Here it is now:
And the transom work...
This:
Turned into this:
This:
to this:
Okay, the next set of pictures are just miscellaneous pictures of the paint today... You may see some of the runs, but I'll you what... I'm so pleased! It looks so much better!!!!
Next post coming up shortly... I have two other sites to post this on!
Re: Duke's Rehab of the CABO 204 Centercon...
Okay, here are 3 more:
Carry on...
Carry on...
-
Tidedancer
- Site Sponsor
- Posts: 2402
- Joined: October 2nd, 2002, 7:30 am
- Location: Carrabelle Beach, FL
Re: Duke's Rehab of the CABO 204 Centercon...
WOW! she sure is lookin great Duke.!! 