Page 1 of 2
1985 Chaparral 198F Rebuild Project
Posted: May 21st, 2006, 9:37 pm
by cgengo
Hey All,
I figured I'd start a thread here to follow a transom replacement and stringer/floor repair job that I'm currently a week into. I purchased this boat from my grandfather at Christmas when he found a smaller one that was easier to launch and handle given his age. I soon found out that the soft spot in the floor was also a completely rotted transom, and once the money came in I decided it was time to fix her up. Lots of reading on ClassicMako.com came in a huge help.
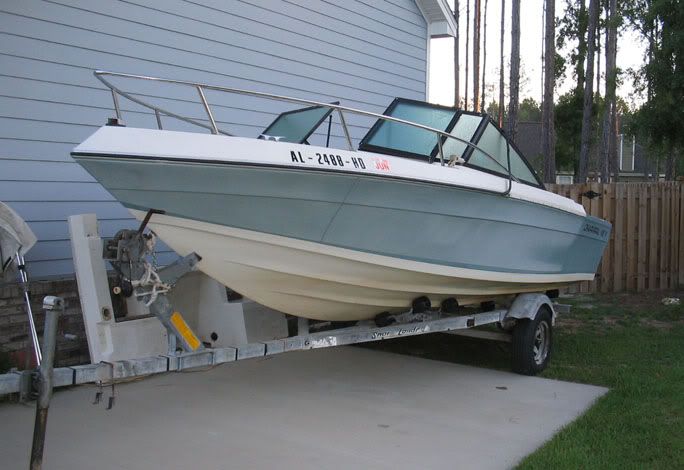
I'll post more tomorrow, but for now here's a picture of the patient. In this picture, the rear upper hull has been removed.
See you on the water soon!
- Chris
NICE LOOKING HULL
Posted: May 21st, 2006, 9:54 pm
by FUTCHCAIRO
THAT IS A NICE LOOKING HULL, I LIKE THE LINES OF THOSE BOATS, THEY ARE REALLY SMOOTH RIDING BOATS, I AM SURE YOU WILL HAVE HER IN FIRST CLASS CONDITION IN NO TIME AT ALL.
PA THE OLD MAN OFTHE SEA
Posted: May 22nd, 2006, 7:56 am
by cgengo
Thanks FC, I have a lot of fond memories of this boat since my granddad would take me and my dad fishing on it when I was younger. It rides a lot smoother than his old Chaparral Tri-Hull, cuts the waves well, and moves fast with the Evinrude 140 2-stroke on the back. It makes a great platform for fishing and taking family/friends out for a day on the water.
- Chris
Posted: May 22nd, 2006, 8:07 am
by Chalk

You can also find alot information on the following sites:
classicseacraft.com
hulltruth.com
bateau2.com
Posted: May 22nd, 2006, 11:06 am
by cgengo
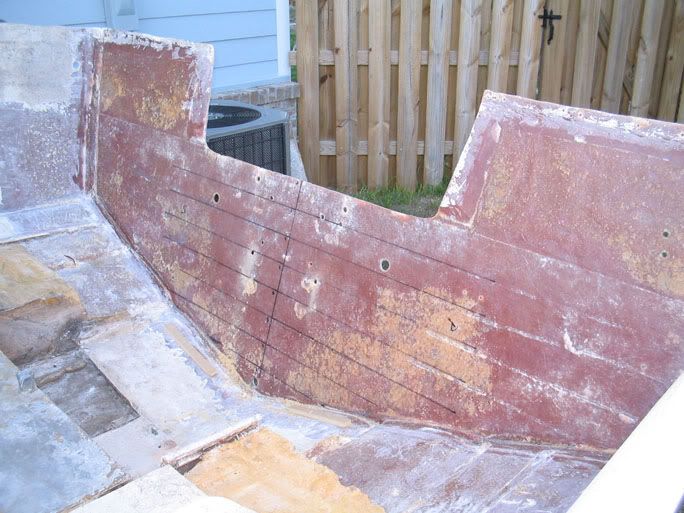
In this shot the transom has been mostly removed. Also seen are the areas where the flotation boxes have been cut away from the back corners and the rear bit of the deck and stringers have been removed. The dark spot behind the gas tank is where the battery box was - I think it may have been the original cause of the rot as the bottom of it was not sealed at all - the whole thing was VERY rotten. It also tied directly into the stringers and the bulkhead behind the gas tank, no glass between the wooden bits. I'll be remedying all of these issues with the rebuild.
This was the hardest part of the project so far. If you attempt this job, try to do it over a weekend, once the wood dries out, it becomes MUCH more difficult to remove. To remove the fiberglass covering, I tried a Rotozip type tool with a spiral bit (did more burning than cutting), the same tool with a cutoff bit (the larger reinforced bits kinda worked but didn't last long and are pricey), reciprocating saw (worked ok but limited usefullness due to size), a jigsaw (no use), a hand saw (worked great for cutting through the top corners of the transom cap), a 1 inch hand chisel (worked but is back breaking labour). I used a shovel (yes, a regular shovel) to remove most of the foam.
Once I removed the fiberglass, I was actually ecstatic to see that the transom was totally rotten or wet from port to starboard because it meant that I had not disassembled my boat for no reason (sorry, no digital pics). Removing the rotten wood was not difficult when it was wet, but was not easy either since there was another layer of fiberglass between the two sheets that had to be cut through. A chisel, flat pry bar, and hammer were my first tools for forcibly removing the plywood.
The lines on the right side are from when I made the realisation (after reading it somewhere) that the best tool for the job was a 16" electric chainsaw. The chainsaw worked AWESOME, it left a couple shallow gouges in the outer skin, but nothing that couldn't be fixed with a bit of resin thickened with Cabosil. And man, did it save me hours of chiseling. I don't think I ever would have finished this step without the chainsaw.

Posted: May 22nd, 2006, 11:09 am
by cgengo
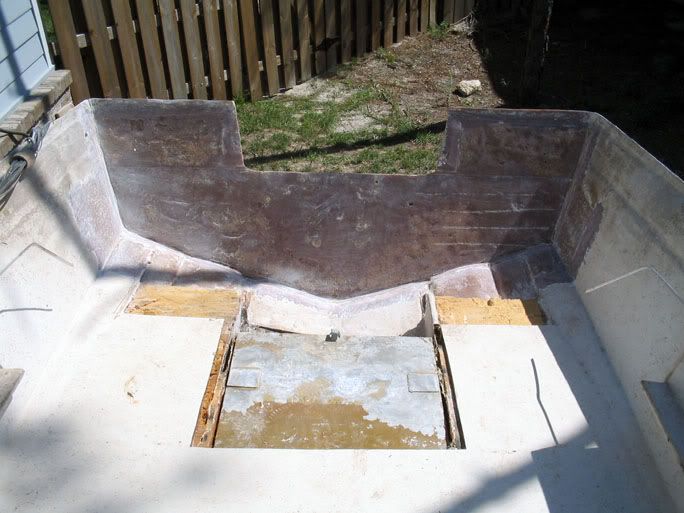
Here's a side view of the previous shot. You can also see where I cut through the upper hull to remove it. I've also removed the battery box and the bulkhead behind the gas tank since both were totally rotten and the gas tank needs to be pulled out and checked, it has a bit of corrosion on top (then again, it is 21 years old).

Posted: May 22nd, 2006, 11:14 am
by cgengo
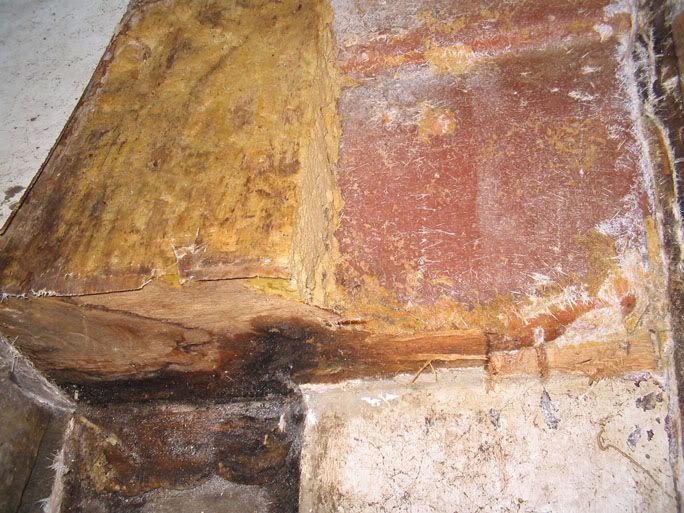
Here's a closeup of the rot in the starboard stringer, most of it was black mud and it continues towards the front of the boat for another couple feet. The fiberglass covering it was disappointingly thin.
Posted: May 22nd, 2006, 11:27 am
by cgengo
I spent Saturday morning grinding off the remaining thin bit of plywood still on the transom skin. Folks, the only tool capable of this job is a high speed grinder, a heavy duty Random Orbital Sander will not work, believe me, I tried to get away with it and realised it didn't stand a chance after only 5 minutes - then I had to drive all the way back to Tallahassee to exchange it for the grinder below. I used a 9.5 Amp Hitachi like the one below outfitted with a backer plate and a pack of 36 grit sanding disks. I used 2 sanding disks to get the transom skin to this point. I also ground the floor and some of the gel coat around the mounting areas for reattachment later.
Oh yeah, when you do this, were long sleeves, pants, long socks, goggles, and a NIOSH approved RESPIRATOR. Please value your lungs and don't try just wearing one of those cotton masks, this stuff is super fine and will coat everything. Plan to itch that night as well.
Here's the grinder I bought, $89 at Lowes, worked great! This is my third Hitachi tool and I love them all.

And here's the outer transom skin after grinding.
Posted: May 22nd, 2006, 11:34 am
by cgengo
Once the transom skin and gel coat had been ground down and cleaned up, I needed to smooth out the areas where I had knicked it with the chainsaw, so I mixed together a thick paste from polyester resin and Cabosil and applied it with a wide putty knife over the entire surface. I also rounded over the hard corners with it. This was my first time working with Cabosil and the stuff is a nightmare to mix into the resin, I'm very glad I mixed it in before adding the MEK-P hardener because I think it would have hardened before I fully incorporated enough Cabosil.
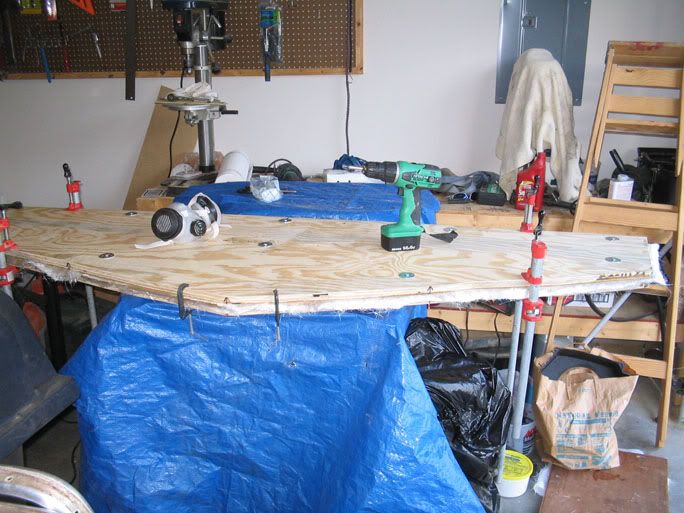
You can also see here where I marked the center line of the transom and then drew parallel lines every 3 inches so that I could measure the transom and then graph it out of a piece of luan ply. This worked really well.
Posted: May 22nd, 2006, 11:41 am
by cgengo
Finally, I spent the better part of Sunday measuring and cutting the luan to fit the transom properly, then traced it onto 3/4" plywood and sandwiched 2 layers of Luan between the 2 pieces of 3/4" BC plywood, knots filled with Bondo and placed on the inside. There is a piece of 1.5oz mat between the Luan and BC, the two pieces and Luan and just resined together. This should be plenty strong as the previous transom was only 1.5" thick. I used a combination of screws with large washers and clamps to hold everything together while curing overnight.
Also pictured is the respirator I used to prevent breathing nasties and another of my Hitachi tools, a 14V cordless drill.
Posted: May 22nd, 2006, 11:44 am
by Chalk
Use cardboard to make the template for the transom....Then transfer to the luan....BTW Capital City Lumber Co Inc. (850) 385-0315 can get Hydrotek and Aquatek is your uncomfortable with using Luan....They might have to order, but I know of one boat buidler that got some from them.
Posted: May 22nd, 2006, 11:47 am
by Chalk
Just saw your second post.....I know some have used bondo, but I'm not sure I would of trusted it....Cabosil and Epoxy slurry would of been my choice....Looks like your on a roll, don't stop, keep the momentum going...
Posted: May 22nd, 2006, 1:23 pm
by cgengo
Hey Chalk,
Thanks for the links and the advice. With the way I did the measurements, it was actually quite easy to get the luan to fit properly, only took about 20 minutes all told. Crawfordville's a tiny town and makes it hard to find large pieces of cardboard or much of anything for that matter, and to buy the stuff is practically the same price as luan, so I just went the Luan route, and it worked well.
Concerning the Bondo in the small knots, it was already waiting in the garage, sets up quick, and sands easily which is why I went with it. I'm not counting on it to provide strength of any sort, just to prevent air pockets in the center of the transom, so I think it'll work fine. Too late at this point anyway, the transom is hard as a rock now. I'm not bothering with marine ply for this project since it's a fiberglass boat and all of the ply will be totally encased in resin, heavily glassed, and gel coated. Also, BC ply is way cheaper, which is a concern. I'll be doing a better job sealing this wood than Chaparral did, and the regular ply they used originally lasted 20 years, so if I get that long out of it, I'll be a happy camper. I'll probably have a newer all composite boat by then anyway.
On a separate note, I'm looking forward to the 3 day Memorial weekend. I should be able to make some huge strides with the boat. I plan to have the new transom permanently mounted and glassed in by then so that I can spend the weekend working on the floor and stringers. I also need to cut the tank out and have it checked and probably replaced. I'm going to double up the stringers alongside the tank and the bulkhead in front of it so that I can put an access hatch over it instead of just burying it in the floor like Chaparral did. I would love to put this thing in the water by the third weekend of June, and seeing as how I'm only a week into the project, I think it's plausible.
- Chris
Posted: May 22nd, 2006, 1:28 pm
by chugbug
I wish I had the time, patients, tools, and know how to attemp things like this. Looks good so far. How do you plan on putting the rear portin of the top piece back on without a seam? Just curious.
Posted: May 22nd, 2006, 3:13 pm
by cgengo
chugbug wrote:How do you plan on putting the rear portin of the top piece back on without a seam? Just curious.
It'll go back on in pretty much exact reverse order that it came off. On a boat like this, the upper and lower hulls do not have a solid fiberglass connection, instead they are connected by a series of rivets and a little bit of silicone gel.
So, to put it back on, I will...
1 - Carve out a bit of foam from the top rail on both sides (what I cut off and what's still on the boat)
2 - Set the top piece back on, it's sitting beside the boat in one nice piece right now
3 - Use the grinder to make sure the splash basin matches up with the front of the new transom
4 - Connect the cut piece to the remaining with a piece of plywood and stainless steel screws.
5 - Put new rivets in to secure the upper and lower hulls together
6 - Rivet the aluminum rub rail base back into the upper hull
7 - Push the rubber rub rail insert back into the base
8 - Use an epoxy/Cabosil slurry to reattach the splash basin to the transom and the transom cap to the transom.
9 - Put a V-notch in the cuts and fill with a Gel-Coat/Cabosil slurry.
This project certainly has tested my patience and I've been working on it most every day from the time I get home until the sun starts setting or I'm dead tired, whichever comes first. I had to temporarily give up riding my bike and going to the gym, small price to pay when I'll finally have a working boat (plus this work is good exercise anyway). Still, the cost for the project including new tools has come to less than $500 so far and should be under $1000 at completion (the new tank will probably be pricey). That certainly beats the $5000 - $7000 price tag to have a professional do it (and that was quoted).
And as an added bonus, I've learned more about boat construction in the last 2 weeks than I ever though I'd know, plus I get to customize the boat a bit as I move forward. I'm seriously considering adding a built in live well this fall and perhaps a built in cooler on the other side. I'll also be rigging the boat for a dual battery setup and completely rewiring the thing. It'll be a ready nice boat by the time I'm done with it.
My hopes are up as the project has been going much better than expected so far, hopefully I can keep it up for a few more weeks and get it finished.

- Chris