1985 Chaparral 198F Rebuild Project

Moderators: bman, Tom Keels, Chalk

You are the man. That is quite a project and it sure looks like you have been very thorough in your preparation at each step. The only think you stated that I think you might need to reconsider is the number of access points to the tank. I was told by the fella redoing my old proline that the USCG now requires at least two access points to inspect built in tanks. 
Thanks for the compliment, MudDucker. When I said a hatch over the gas tank, what I meant was a full sized hatch, slightly larger than the tank itself, secured in with stainless steel screws and some means of water rejection, like silicone or a high density closed cell foam tape, haven't decided yet. The silicone or 3M 5200 would certainly keep the water out but would make it a bear to remove the hatch for tank inspection. The high density foam or rubber (like weatherstripping) would have a shorter life and less effectiveness but so long as I planned a method for water drainage to the bilge, it shouldn't prevent much of an issue, plus it would be easy to lift the hatch to inspect the tank on a monthly basis.
Anyone have thoughts on this?
Anyone have thoughts on this?
But isn't the purpose of the bilge to gather water so that it can be pumped out of the boat? I mean, yes, ideally, I would like to keep all water outside of the boat, but when water splashes over the side, or I pull in a soaking wet anchor line, or when I'm washing fish guts from the inside of the boat, the water has to collect somewhere to be drained or pumped out, and that's what the bilge is for. If water wasn't supposed to be in there, then why don't we just fill them with foam and seal them off permanently?MudDucker wrote:When discussing the boat I am having redone, I made it clear that I didn't want any water in the bilge. No matter how well protected, wood and water eventually equal rot.
In the way my boat is constructed, there is a piece of wood that runs most of the length of the boat, tying together the left and right side of the vee hull (It's about 8" wide and 3/4" tall). At each bulkhead (one before and one after the fuel tank) there is a hole that allows water to drain through this piece and then flow down the center of the vee hull all the way to the exit in the rear bilge where there is a drain plug and bilge pump.
Also, if liquid cannot flow past the fuel into the bilge, then any moisture that were to collect around the tank would be held there, corroding the tank or, if it was gasoline, becoming a very dangerous hazard. What I'm saying is that I will do what I can to minimize water entry from the tank hatch, but should it find it's way into there, there has to be a way for it to drain out. This is actually one of the main reasons that I believe this boat rotted in the first place, there was no drain from the tank area to the bildge, but there was an area in the rear floor where the fuel line penetrated the floor and there was a significant gap where water could get into the tank hold and sit there. One of the first things I did when starting on this boat repair was to drill a 1/2" hole at the bottom of the rear bulkhead to drain water that was sitting below the gas tank with no way to get to the bilge. That bulkhead was totally rotten, all black mud, and I don't intend to make the same mistakes that Chaparral did. I would tend to think that high density weather stripping would provide very good water proofing so long as it was secured down tight with screws every 6 - 8 inches and checked annually for resiliency. Am I wrong here? Or should I silicone it down with just a few screws and place a small hatch over the fuel input and venting lines and another over the middle of the tank?
Or have I totally misunderstood what you were saying?
Most boat builders who build using wood try to never have a place where water can puddle and hold against the wood. I am not saying you are going to be 100% successful, but my goal, with wood, is to keep as much water out as possible. Since we can not be 100% sucessful, you need to be sure you have a bilge that can drain and/or be pumped out. As for the foam, in Boston Whalers, where there is no wood in the construction, they do fill the bilge with foam with drainage channels. However, little water ever got into my BW bilge and when it did, I went hunting a cause. This boat I'm redoing had foam pumped into the bilge area. Usually I found a loose hatch cover. Most saltwater boats today are built with a self bailing decks so that water can run off of the deck when you pull your wet anchors or have spray or swells dump water into the boat. With me, I am hoping this boat I am having redone will never need to have the bilge pump turned on.
Okay, I might be starting to learn something here, so stick with me for a short discussion please. I'm pretty sure my boat does not have a self bailing deck. The water collects in the bilge and it gets pumped out, there is no way for it to flow out right now. Is that what ball scuppers are for?
I've seen pictures of boats with no open bilge but they have drains in the floor. Do these drains lead to scuppers that allow water out but not in? How are they installed? Do they go through the transom or hull? Above the waterline, correct?
Do you think it would require an inordinate amount of work to change a boat like mine to a self bailing deck? I was thinking about changing up the rear of the boat anyway because the splash basin on it is huge and takes up too much room, and I wouldn't want to sit in either of those rear seats with the motor roaring away, there's plenty of seating up front anyway. I was thinking of creating storage basins or a cooler and a live well built into the rear platform of the upper hull. Hmmm....
Could someone please point me to some more resources on self bailing decks and how to create them in a boat that was not designed with them? Maybe some pictures of what they are and how they work...
Is that what this page is all about?
Thanks,
Chris
-
Chalk

- Moderator
- Posts: 9550
- Joined: March 9th, 2002, 7:00 pm
- Location: 30° 13' N, 85° 40' W
- Contact:
Depends on the boat and how you finish it....most importantly is the water line of the boat....Knowing how low or high the boat floats will determine if you can have a self bailing boat....if you have floor you always need a bilge be it open or covered...Adding scuppers is easy once you know where the water line is.....nothin more than a scupper, pvc (if needed) and some sealants....Figuring where the water line is the hardest part, too low and you will have to use the ball scuppers or plug them in rough water to keep your feet dry.

The inside floor of the boat needs to be above the water line when the boat is sitting at rest. If the floor of the boat is lower than the water line, the ball scuppers will keep most of the water out. but what water gets in the boat can't drain. All self bailing boats are gravity drained.
Talk to Steve Stinson. His Sea Pro was intended to be self bailing. But the floor was lower than the water line when the boat was at rest. This caused water to back up into the flor through the scuppers. If I'm not mistaken, Steve plugged his scuppers, and re configured to allow water inside the boat to drain into the bilge.
Talk to Steve Stinson. His Sea Pro was intended to be self bailing. But the floor was lower than the water line when the boat was at rest. This caused water to back up into the flor through the scuppers. If I'm not mistaken, Steve plugged his scuppers, and re configured to allow water inside the boat to drain into the bilge.
What was I supposed to do today?
Man, I'd be ill if this happened to me. Was this a factory configuration or a redo?tin can wrote:The inside floor of the boat needs to be above the water line when the boat is sitting at rest. If the floor of the boat is lower than the water line, the ball scuppers will keep most of the water out. but what water gets in the boat can't drain. All self bailing boats are gravity drained.
Talk to Steve Stinson. His Sea Pro was intended to be self bailing. But the floor was lower than the water line when the boat was at rest. This caused water to back up into the flor through the scuppers. If I'm not mistaken, Steve plugged his scuppers, and re configured to allow water inside the boat to drain into the bilge.
The safest boat is a boat with a well sealed bilge. Keeping air in there adds buoyance. This is why large ships have sealing passages so that they can make compartments air tight.
The good, the Bad, and the Ugly
Well, it's been a couple of weeks since I updated this thread with progress. As with any project of this magnitude, there has been good, bad, and just plain ugly...
THE GOOD
I've been working on the boat, but mostly on the weekends and mostly just glassing the transom in. I am lucky to have a friend with a 2000 sq ft garage and even luckier that he allowed me to use it while he was away on a cruise for a week and a half. The new transom went in a whole heck of a lot easier than the old one came out, plus it's incredibly strong now. Amazing how much longer you have to apply the resin when you're working in a large shaded building versus in the hot sun. I built up 3 layers of 1.5oz mat on the inside, I've got some small bubbles to grind out but otherwise it went swimmingly.
Here's a picture of the new transom glassed into place.
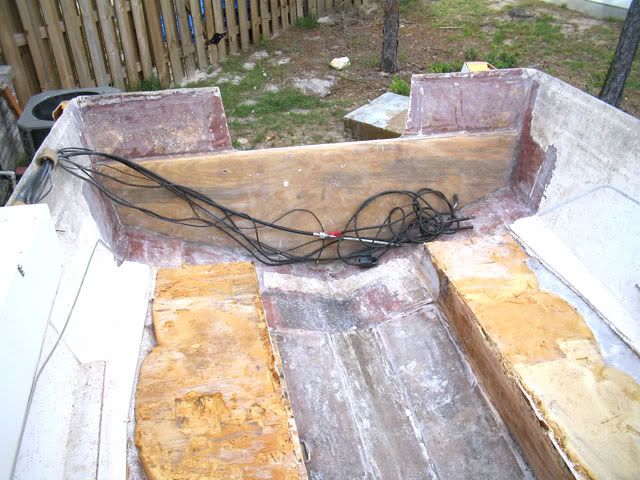
Also, I pulled the gas tank out about 2 weeks ago. I had it checked out by a friend in the know. It's a 23 year old aluminum tank, but it's in amazingly good shape. My friend says the fact that the whole thing was glassed has probably extended it's life significantly. There were a couple small divots under the small rubber pads, but not enough to warrant the purchase of a new tank quite yet. I'll hit them with a steel brush and put some epoxy over the areas to slow any more damage to the tank. I'll be putting a full hatch over the tank with the new floor so I can check on it every year or so to see how's it's holding up, should be good for another few years at least.
THE BAD
I brought the boat home today hoping to build stringer replacements for the rotten areas in the rear of the boat. I was able to cut a 32 and 40 inch stringer from leftovers from the transom. I thought this would be plenty to tie into good areas for the new stringers and then I could move onto the floor and have this puppy floating in a month.
THE UGLY
I started cutting the fiberglass skin off the inside of the port stringer and realized that the rot seemed to extend a bit further back than I previously thought. The top of the stringer was in good shape but the bottom 2/3s was severely rotted. My initial thought at the this point was 'Crap, I'll have to use that extra piece of plywood I bought and can't return it.' So I used the grinder and cut back another 12 inches...more rot...another 12 inches...more rot...another 12 inches...you guess it, more rot. The dag'um port stringer is rotted from aft to bow. And here I thought I was pretty much done with the deconstruction part of this project.
A pic from the back of the boat as of the end of today.
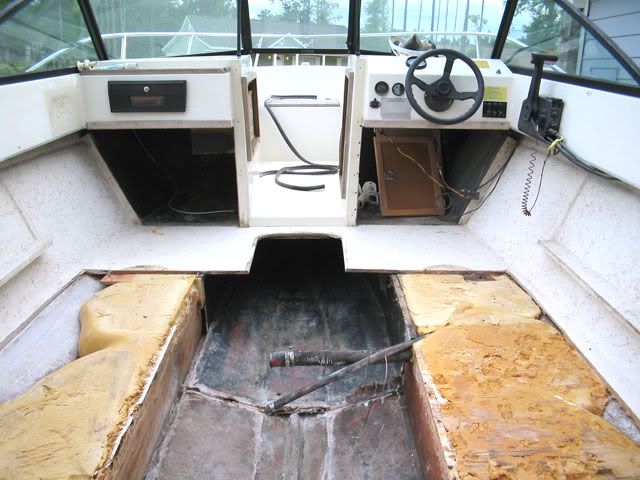
Because the stringer was rotted, the floor sitting on it would have to be removed, so I removed the driver and passenger seats and proceeded to cut the floor out, it went pretty smoothly. The rot in the stringer passed the forward bulkhead for the gas tank and I quickly realized that the rot had spread into the bulkhead, damn Chaparral for not putting waterproofing between the different pieces of wood in this boat. I grabbed the grinder again and proceeded to cut out the forward bulkhead. I haven't investigated the extent yet, but some rot did spread to this forward area of the starboard stringer, I pray it's not much.
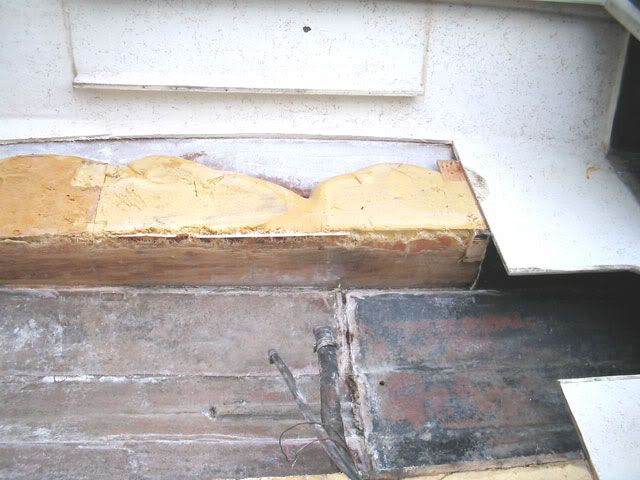
A closeup on that port stringer, it's been removed and scraped clean, at least it came out easily.
SUMMARY
Things could be worse, but this project is wearing on me. There is NOTHING fun about grinding fiberglass into trillions of minuscule pieces in the hot Florida sun. This is the first boat I have owned, and I can promise it will be the last wooden one, all composite from here on forward for me.
- Chris
THE GOOD
I've been working on the boat, but mostly on the weekends and mostly just glassing the transom in. I am lucky to have a friend with a 2000 sq ft garage and even luckier that he allowed me to use it while he was away on a cruise for a week and a half. The new transom went in a whole heck of a lot easier than the old one came out, plus it's incredibly strong now. Amazing how much longer you have to apply the resin when you're working in a large shaded building versus in the hot sun. I built up 3 layers of 1.5oz mat on the inside, I've got some small bubbles to grind out but otherwise it went swimmingly.
Here's a picture of the new transom glassed into place.
Also, I pulled the gas tank out about 2 weeks ago. I had it checked out by a friend in the know. It's a 23 year old aluminum tank, but it's in amazingly good shape. My friend says the fact that the whole thing was glassed has probably extended it's life significantly. There were a couple small divots under the small rubber pads, but not enough to warrant the purchase of a new tank quite yet. I'll hit them with a steel brush and put some epoxy over the areas to slow any more damage to the tank. I'll be putting a full hatch over the tank with the new floor so I can check on it every year or so to see how's it's holding up, should be good for another few years at least.
THE BAD
I brought the boat home today hoping to build stringer replacements for the rotten areas in the rear of the boat. I was able to cut a 32 and 40 inch stringer from leftovers from the transom. I thought this would be plenty to tie into good areas for the new stringers and then I could move onto the floor and have this puppy floating in a month.
THE UGLY
I started cutting the fiberglass skin off the inside of the port stringer and realized that the rot seemed to extend a bit further back than I previously thought. The top of the stringer was in good shape but the bottom 2/3s was severely rotted. My initial thought at the this point was 'Crap, I'll have to use that extra piece of plywood I bought and can't return it.' So I used the grinder and cut back another 12 inches...more rot...another 12 inches...more rot...another 12 inches...you guess it, more rot. The dag'um port stringer is rotted from aft to bow. And here I thought I was pretty much done with the deconstruction part of this project.
A pic from the back of the boat as of the end of today.
Because the stringer was rotted, the floor sitting on it would have to be removed, so I removed the driver and passenger seats and proceeded to cut the floor out, it went pretty smoothly. The rot in the stringer passed the forward bulkhead for the gas tank and I quickly realized that the rot had spread into the bulkhead, damn Chaparral for not putting waterproofing between the different pieces of wood in this boat. I grabbed the grinder again and proceeded to cut out the forward bulkhead. I haven't investigated the extent yet, but some rot did spread to this forward area of the starboard stringer, I pray it's not much.
A closeup on that port stringer, it's been removed and scraped clean, at least it came out easily.
SUMMARY
Things could be worse, but this project is wearing on me. There is NOTHING fun about grinding fiberglass into trillions of minuscule pieces in the hot Florida sun. This is the first boat I have owned, and I can promise it will be the last wooden one, all composite from here on forward for me.
- Chris
-
chaparralman
- Posts: 3
- Joined: May 13th, 2012, 9:14 pm
Re: 1985 Chaparral 198F Rebuild Project
i am doing the same thing to the same boat but mine is an 86. do you have any tips? thanks

Re: 1985 Chaparral 198F Rebuild Project
again, I'm not sure that cgengo is around anymore. I'd recommend you spend some time on the iboats.com forum. There are more floor and transom replacements there than you can shake a stick at. From the ones I've looked at, it isn't a terribly difficult job. Mostly follow the mixing instructions for the resin/hardener, get it on the wood before it kicks, and make sure you have clean surfaces before you start to add material.
850-273-8818

Re: 1985 Chaparral 198F Rebuild Project
Hey Chris,
On one hand I feel your pain. I've completed many such projects. On the other hand there is nothing like the feeling of finishing it, and launching it for the first time. My latest is a 1989 Sunbird Bowrider ski boat. I bought it just for the motor. The floor was rotted out, as well as the stringers, and the runners. No floatation to speak of in the whole boat. My only break, was that the transom was sound. After looking at the lines of the boat, I decided to turn it into a center console. I cut the top of the boat off, at the top of the gunnels, leaving nothing but a shell.
After a very long process, now it's one of my favorite flats boats I've ever owned. It runs high and dry, and floats in just a few inches of water. Good luck on the build.
- SDC10607.jpg (102.57 KiB) Viewed 4703 times
- SDC10605.jpg (100.55 KiB) Viewed 4703 times
Semper Fi
-
chaparralman
- Posts: 3
- Joined: May 13th, 2012, 9:14 pm
Re: 1985 Chaparral 198F Rebuild Project
thanks
lonesouth wrote:again, I'm not sure that cgengo is around anymore. I'd recommend you spend some time on the iboats.com forum. There are more floor and transom replacements there than you can shake a stick at. From the ones I've looked at, it isn't a terribly difficult job. Mostly follow the mixing instructions for the resin/hardener, get it on the wood before it kicks, and make sure you have clean surfaces before you start to add material.
Re: 1985 Chaparral 198F Rebuild Project
Chris,
I rebuilt an old 18 foot 1987 Custom Craft center console once. It had a built in 20 gallon aluminum saddle tank. The tank trapped water just like you stated. When I put it back together I had a new aluminum tank made. It was made to allow me to install a piece of 3" PCV cut in half to fit under the tank. I poured foam completely around the sides of the tank on four sides and bottom. I still had the flow thru area underneath the tank, but it was not exposed to raw water. I had to sacrfice two gallons capability, so it's now only 18 gallons. I then built a hatch in the deck above the tank that was just a little larger all the way round of the tank. I left a one inch shelf under the hatch to screw down the access hatch onto. I also used stainless trim pieces to frame the hatch and drilled the holes through that into the shelf. I put two 8 inch round inspection plates above the tank fittings and sending units for qiuck inspections. Sealed the cover with a good silicon sealent. I've had to access the tank a few times over the years. Takes just a little effort to pull it up and replace it. It's been fourteen years, and so far the tank is holding up well.
On another note, I know two people with Cape Horns and one with a Carolina Skiff with self bailing hulls. They all three have to use plugs in the scuppers to keep the water out when setting still.
Semper Fi